
From nothing to on the mesh, in an afternoon
You need one small radio and the phone you already own. No license, no exam, no account, and no recurring cost. Here's exactly what to buy and what to do with it.
Four steps, start to finish
01
Buy a companion
A WisMesh Tag is the safest first purchase. It's small, weatherproof, and it has a built-in antenna so you don't have to worry about that yet.
02
Flash MeshCore
Firmware goes on over USB from a browser-based flasher. Ten minutes, no toolchain, no soldering. We'll walk you through it if it's your first time.
03
Install the app
MeshCore for iOS or Android. It generates your keypair on first launch and pairs to the board over Bluetooth.
04
Join a channel
Get on the regional channel, say hello, and see who hears you. Then dial in the settings below so your node plays well with the rest of the mesh.
Prices and board availability change constantly. Ask in the group before ordering, we keep track of what's currently in stock and what's worth avoiding.
Which board should you buy?
All of these run MeshCore. The difference is what job you want the node to do.
WisMesh Tag
Recommended for new users. It's easy to use, well supported, and easy to carry around on a daily basis.
Heltec WiFi V4
There are more of these on the mesh than anything else, it has a lot of power for a low cost but can be a little power hungry.
Heltec T096
Has a lot of power for a moderate cost without being too power hungry.
RAK WisBlock (4631)
Very low power draw and a modular enclosure ecosystem. The usual choice for a solar repeater that has to sit on a mast and be forgotten.
Station G2/G3
The G2, and G3, is a modular high-power fixed node for a good site. May be more difficult to get as stock is low but might be able to find it used.
XIAO nRF52 w/ Wio-SX1262
An inexpensive compact LoRa board which is a good choice for a repeater if you are comfortable with soldering and want to save money.
Make sure you're buying the 915 MHz version
Antennas, mounts, and power
Once the board works on a desk, everything that determines whether it is useful is outside the board. Where you put the antenna, how high it goes, and whether the power source survives a week of clouds.
For a handheld or vehicle node
A decent whip antenna and a USB power bank is genuinely all you need. In a truck, a mag-mount on the roof makes a large difference over an antenna inside the cab.
For a repeater
A weatherproof enclosure, a small solar panel with a lithium pack sized for several cloudy days, and a mount that gets the antenna as high as you can safely reach. Use proper coax, keep the run short, and seal every connector.
Run the site through the explorer first. Terrain decides this, not hardware, and it is much cheaper to learn that from a terrain profile than from a ladder.
Replace the stock antenna first
The little rubber antenna in the box is the weakest part of any kit. A decent 915 MHz whip is the cheapest range upgrade you will ever buy.
Height beats gain
A modest antenna twenty feet up outperforms an expensive one at head height. Spend your effort on the mount before the hardware.
Never transmit without one
Powering a LoRa board with no antenna attached can damage the radio. Connect the antenna before you plug in USB, every time.
Dial in your companion
The defaults will get you on the air, but not all of them are good defaults. These four are ordered by what it costs you to skip them: the pairing PIN first, because a weak one hands your node to anyone standing nearby, then a privacy decision only you can make, then two that shape how well you sit on the mesh and how long the battery lasts.
- 01
Bluetooth Pairing PIN
Boards without a screen- Where
- Settings → Other Settings → Bluetooth Settings
- Set to
- Custom, with a PIN of your own
A companion with a screen invents a random PIN every time you pair and shows it on the display, so there is nothing for you to do. A companion without a screen has nowhere to show one, so it falls back to a fixed default instead: 123456. That default is not a secret, it is the same on every screenless board and it is written down in public, so anyone within Bluetooth range can pair with your node and take over the app side of it. Change it before you take the device out of the house. In the app, open Settings, scroll down to Other Settings, then open Bluetooth. Switch Bluetooth Pin Type to Custom and enter six digits of your own underneath. The app validates what you type, it has to land between 100,000 and 999,999, so it is always a full six digits and can never lead with a zero, something like 012345 is rejected. Tap the check mark to save. Then write the PIN down somewhere you will not lose it, because recovering a forgotten one is not a reset button, it means reflashing the device over USB.
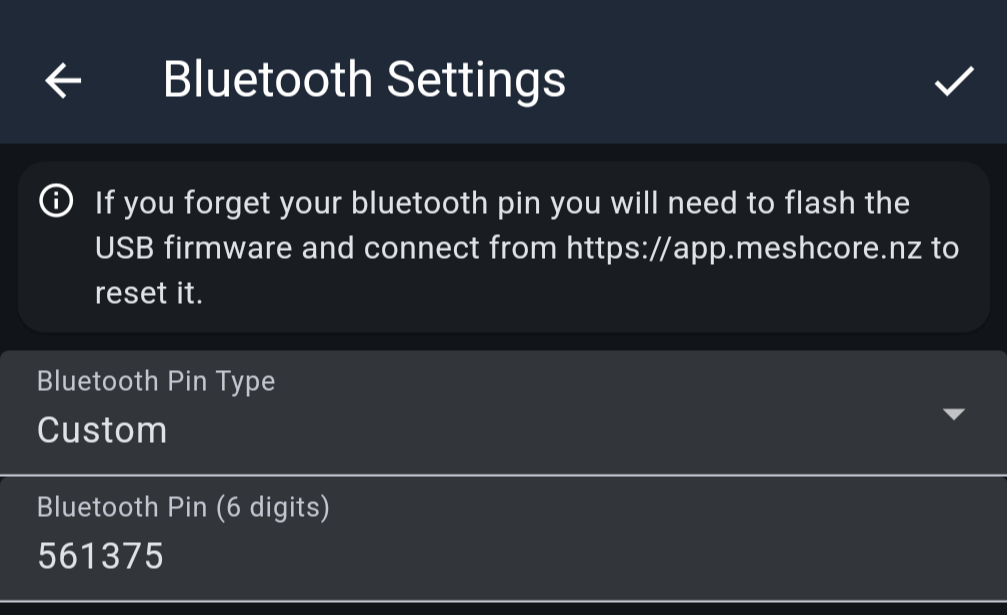
Set Pin Type to Custom, enter six digits, then tap the check mark. - 02
Share Position in Advert
- Where
- Settings
- Set to
- Leave unchecked
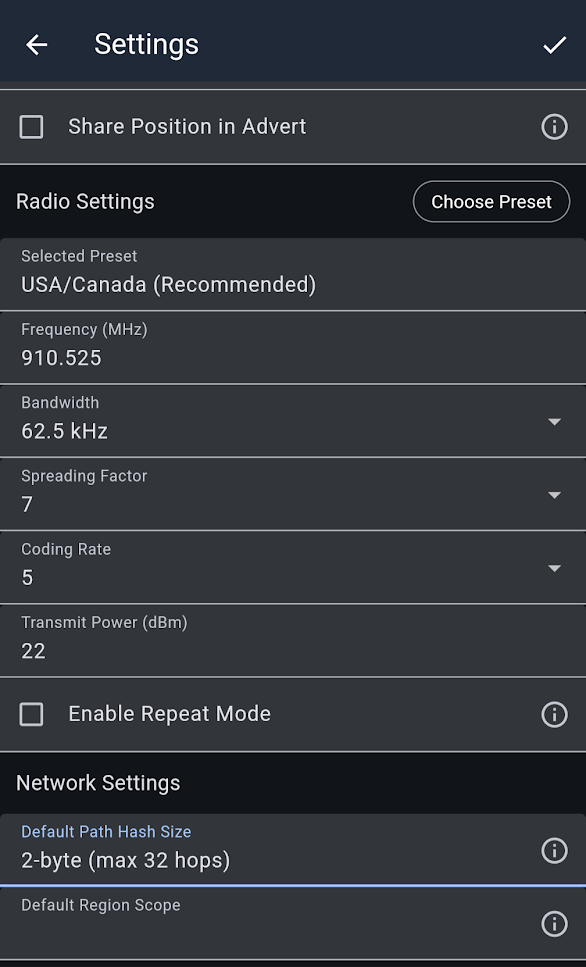
Your companion periodically advertises itself so other nodes know it is there. With this enabled, that advert carries your current GPS position, and anyone in range can see where you are. That is genuinely useful for a work crew or a response team keeping track of each other, and it is a real exposure if you would rather not broadcast your location. It ships unchecked. Leave it that way unless you have a specific reason to turn it on.
- 03
Default Path Hash Size
- Where
- Settings → Network Settings
- Set to
- 2-byte (max 32 hops)
The Austin-area network runs with this setting, so matching it keeps your messages moving efficiently in places with a lot of repeaters. This is the one setting on this page where the right answer is decided by the network rather than by you, if your companion disagrees with everyone else, your traffic is the traffic that suffers.
- 04
GPS Mode
- Where
- Settings → Other Settings → Position Settings
- Set to
- Disabled
If your board has its own GPS receiver, it draws power the entire time it is powered on. Turning it off and letting the app supply your phone's location instead buys you meaningfully more runtime between charges, and your phone's GPS is usually the better receiver anyway. Skip this step if your board has no GPS; many of the cheaper ones do not.
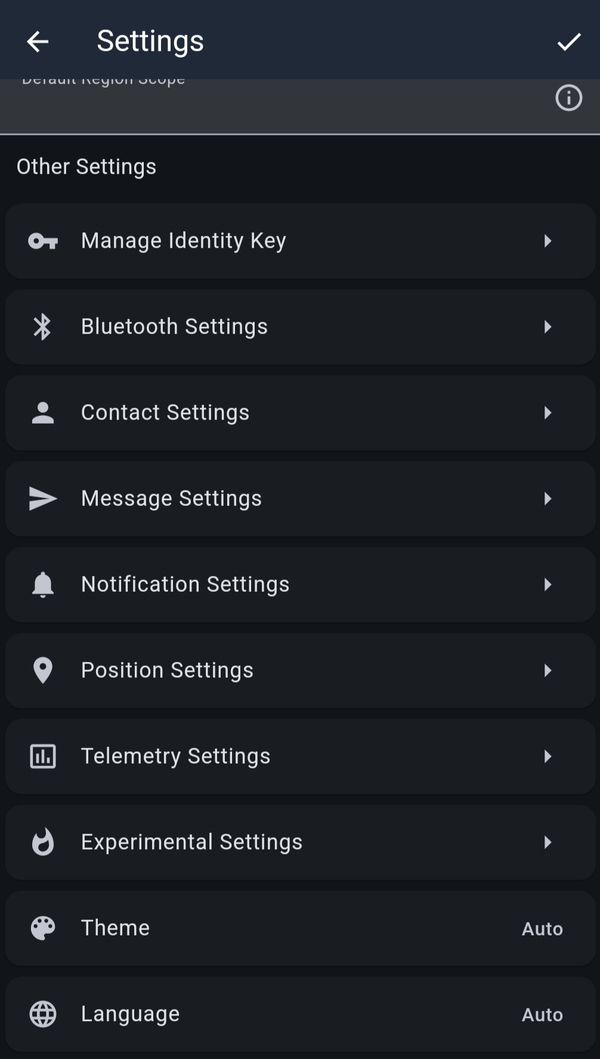
Scroll to Other Settings and open Position Settings. 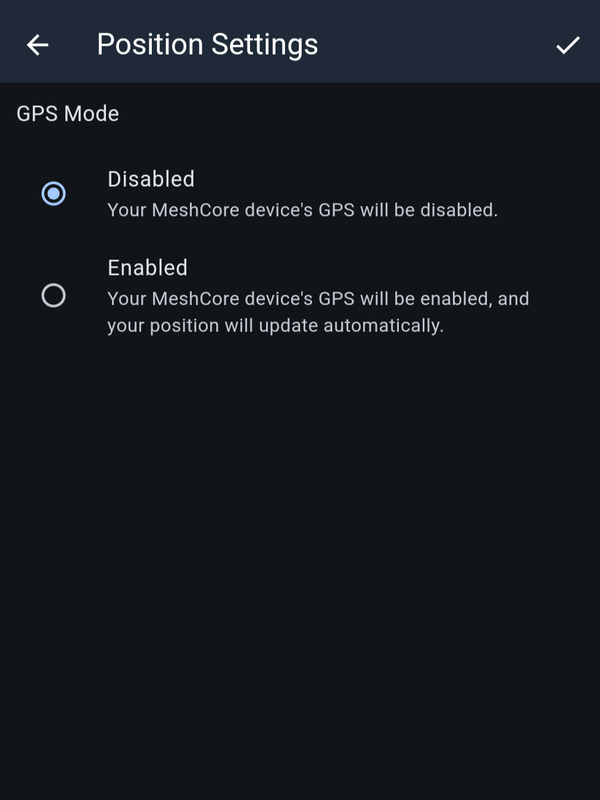
Set GPS Mode to Disabled.
Set up a repeater
A repeater is tuned for different things than a companion. Start by giving it an identity of its own, every other repeater step builds on this one.
- 01
Generate a keypair with a unique 2-byte prefix
A repeater is identified on the mesh by its public key, and the first two bytes of that key act as its short prefix. Two nodes sharing a prefix are ambiguous to everything around them, so pick one nobody else on the network is already using before you generate the key.
First, claim a prefix
The analyzer has a prefix tool that will generate an unused 2-byte prefix for you, or tell you whether one you already have in mind is free.
Then, generate the key, and back it up
Generate the public/private pair with mc-keygen↗, matching the prefix you just claimed. Store the private key somewhere secure before you go any further. It is what lets you restore the same identity if the repeater ever has to be replaced, and it is not recoverable from the device afterwards.
Finally, write the key to the repeater
Two routes. Use the first if the repeater is already mounted and you would rather not take it down; use the second if you have it on the bench.
Remotely, from your phone
- Generate the key at gessaman.com/mc-keygen↗ on the phone itself, so you never have to retype it.
- In the MeshCore app, log in to the repeater with its admin password.
- Open the Command Line tab at the bottom of the screen.
- Enter the command, substituting your generated key, and press enter:
set prv.key <private key> - The repeater replies
OKif it took. Then restart it:reboot
From a PC, over USB
- Generate the key at gessaman.com/mc-keygen↗ in another tab, so you can paste it straight into the console.
- Connect the repeater to the computer with a USB cable.
- Open the MeshCore Flasher Console↗ and connect to the repeater through its serial port.
- Enter the same command, substituting your generated key:
set prv.key <private key> - Again it replies
OKon success. Restart it to finish:reboot
- 02
Set the Path Hash Size to 2-byte
Same setting your companion needs, same reason: the Austin-area network runs on 2-byte path hashes, and a repeater that disagrees makes routing worse for everything downstream of it. Unlike the companion, this one is changed through the repeater's admin screens rather than your own settings.
- In the MeshCore app, open the repeater from your contact list and log in to Repeater Admin with its admin password.
- Tap the Settings tab along the bottom, then scroll down to Network Settings.
- To see what the repeater currently has stored, tap the refresh icon beside the check mark on Path Hash Size. Values are not fetched automatically, the app asks you to request them so it is not spending mesh airtime on settings you did not ask to see.
- Select 2-byte (max 32 hops) and tap the check mark to save it.
- Scroll to the bottom of the Settings tab and tap the reboot button. The change does not take effect until the repeater restarts, and there is no need to drop to the command line for it here.
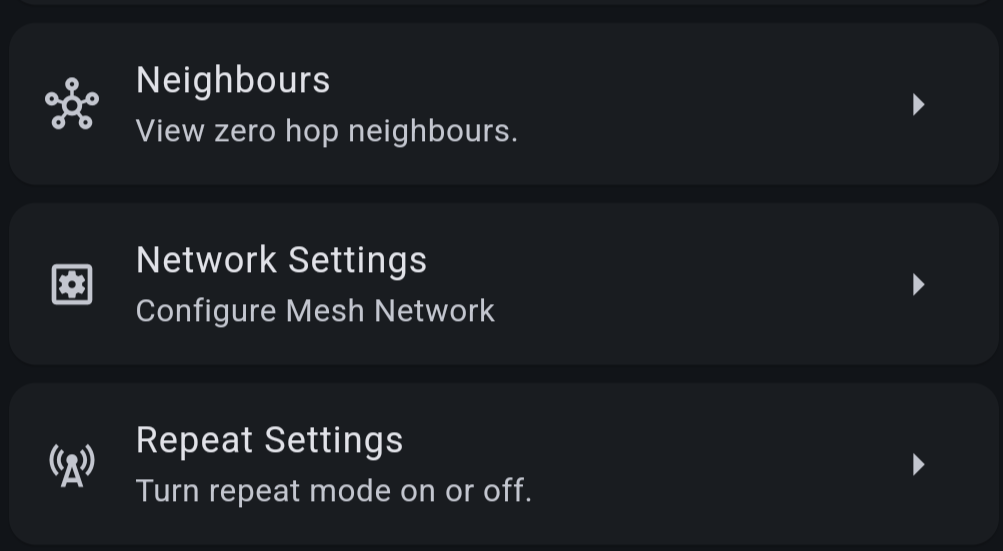
On the Settings tab, scroll to Network Settings. 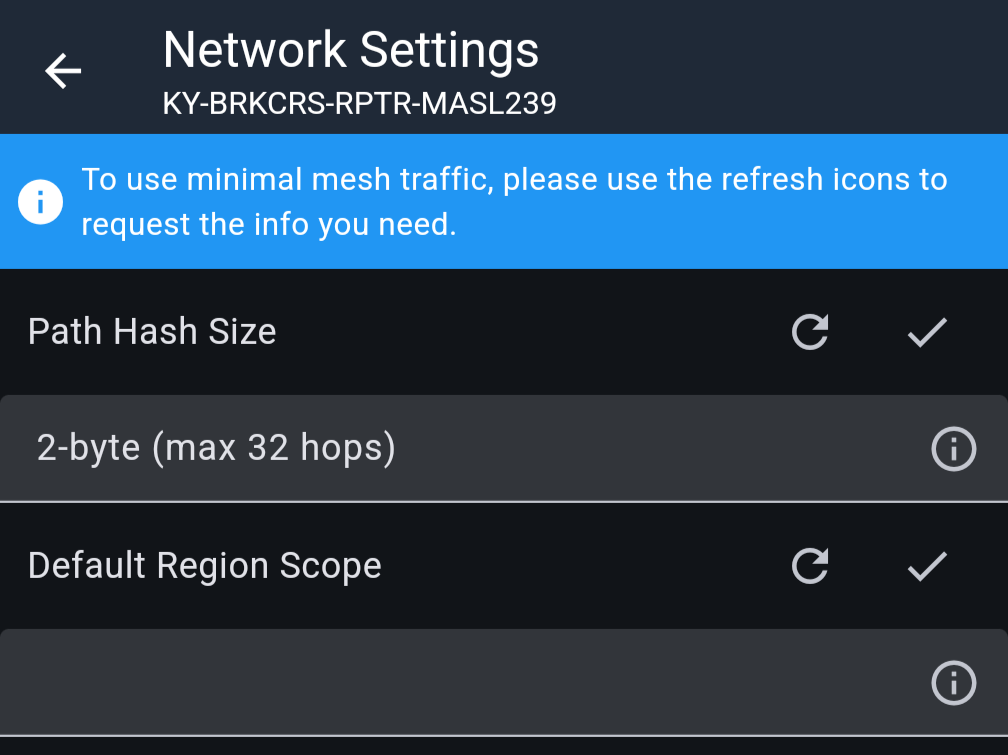
Refresh to read the current value, pick 2-byte, then tap the check mark. - 03
Set the advert intervals
A repeater announces itself with adverts so the rest of the mesh knows it is there. Zero-hop adverts reach only its direct neighbours; flood adverts travel outward across the network. Both run on timers, and the numbers below are what established repeaters on this network use.
- Open the repeater from your Contact List and enter Repeater Admin. Resume the previous admin session if it is still open, or enter the admin password again to start a new one.
- Tap Settings at the lower right, then scroll down to Advert Intervals.
- Tap the refresh icon on both Auto Advert (Zero Hop) and Auto Advert (Flood) to pull the values the repeater currently has stored. Neither is fetched until you ask for it.
- Set the two intervals, then tap the check mark on each to save. Mind the units, one field is in minutes and the other is in hours:
- Auto Advert (Zero Hop)
- 240 minutes
- Auto Advert (Flood)
- 23 hours
Unlike the Path Hash Size in step 02, these intervals take effect the moment you save them, no reboot required.
If this is a brand new repeater
Those intervals are tuned for repeaters the network already knows about. A node nobody has heard from yet should not wait up to 23 hours to introduce itself, tap Advert on the settings screen, just above Advert Intervals, a few times over the next ten minutes to announce it.
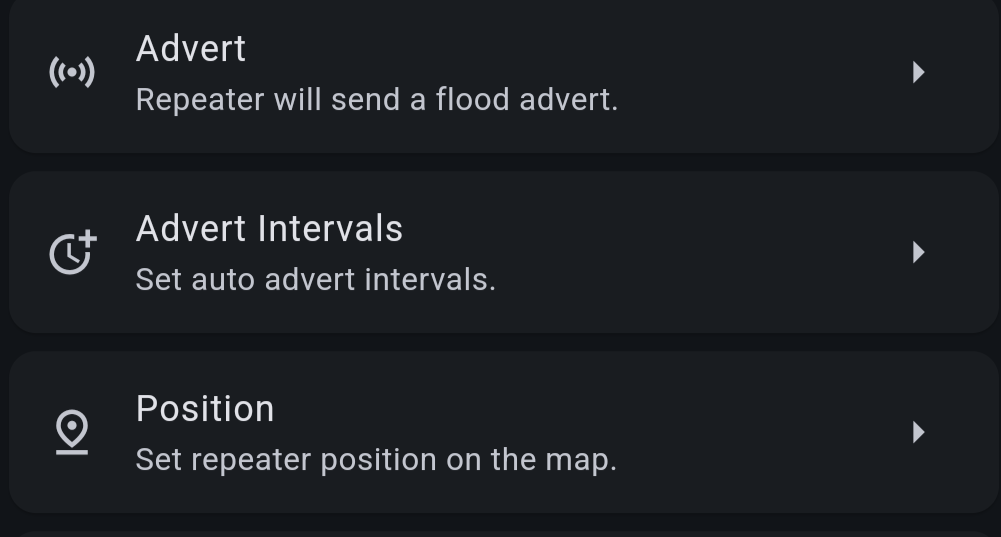
Advert Intervals sits just below Advert on the Settings tab. 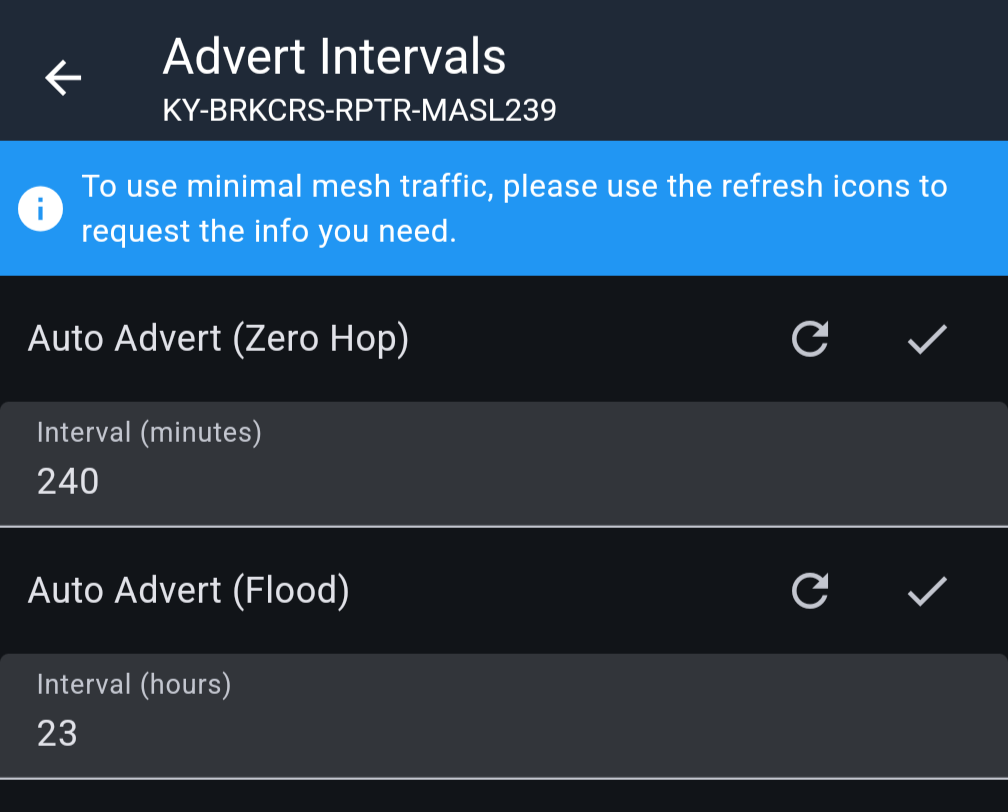
Refresh each value, set 240 and 23, then tap the check marks.
More repeater steps
Coming soonDuty cycle, power budget, and how much traffic a repeater is willing to carry all still need writing up. Until they land, ask in the group before you put a node on a mast, somebody has already tuned one on a similar site.
Stuck? That's what we're for.
Nobody's first flash goes smoothly. Bring the board to a meetup or post what you're seeing, somebody in the group has hit the exact same error and can save you an evening.